Sunday, October 28, 2018

One More...

I have another card to share...
I used Recollections 6x6 paper pad and a sketch from the WCMD Crop at Sketch-N-Scrap for this one:


I used vellum for the top and a few different patterned papers on the bottom. I fussy cut the tag and snowflakes:


Here's the sketch:


As always, thanks for dropping by!

Saturday, October 27, 2018

Another Card

Hello!
Today I am sharing a Christmas card I created using a sketch from Sketch-N-Scrap and a Recollections 6x6 paper pad:


I used gold thread and added some machine stitching. I fussy cut the little gingerman by the sentiment.
Here's the sketch:


Thanks for stopping and have a great day!

So Happy Together

Hey there!
I have a layout and tutorial up on the ScraPerfect Blog today.
Here is my layout:


For this layout, I used Transfer Foil, The Best Glue Ever with the No Clog Writing Cap attached, and The Perfect Crafting Pouch along with Crate Paper Love Notes collection.
I have had this XOXO banner sitting on my desk that I cut from my Cameo on white cardstock. I had planned on using it for another layout but didn't. So I decided to use it for this page of my hubby and I. I added Transfer Foil to it:


I added a thin layer of The Best Glue Ever using a paint brush. After I had it covered, I moved it to another piece of paper just so that it wouldn't stick to the one I had glue all over:


I let it dry for about 10-15 minutes:


Once it dried to a clear finish, this stage it is tacky, I placed the Transfer Foil on top, with the color side up and used my fingers to rub over the diecut:


After you have rubbed it, peal away the foil and this is the result. Since I used a textured cardstock, I don't have complete coverage. This is the result I was going for:


Finally, I rubbed the Perfect Crafting Pouch over the front of my banner to get rid of any stickiness the glue may have left:


I decided I needed a few foiled hearts for my page, so I started the above process on 3 diecut hearts:


Here are a few close ups of my layout:
See those gorgeous foiled hearts? I love them!


and check out that pretty shiny banner! Love that too!


The next time you have some scrappy time, try foiling your diecuts. The end results are fabulous!


Friday, October 26, 2018

Making Christmas Cards

Hey there!
I have been making a few Christmas cards here and there so that by the time I send them out, I have them all made.
I used a sketch from Stick It Down along with Fancy Pants Holiday Hustle for this card:


I stitched the 2 patterned papers together. I added a few tags, popping one up with foam tape to add some dimension:


Here's the sketch:
Thanks for stopping by and have a great weekend!


Camping Buds

Hi there!
We did a fair amount of camping this summer with friends. I am sad to say we are done camping until next year. I used a photo of the friends we camp with along with a cut file from Paper Issues and a variety of manufacturers for this fun page:


I backed the cut file with a paper from Bella Blvd and added some messy stitching:


This sun cut file has been in a drawer, I thought it was perfect for this outdoor page. I used watercolors to color it. I added a sticker popped up with foam tape:


I placed my title in the clouds and added a fussy cut camper:


This was such a fun layout to create!


Thursday, October 25, 2018

Beach Please!

Hey there!
I am sharing a layout I created for a challenge at Paper Issues.
I used Simple Stories Hello Summer for this page:


I created my background using watercolors. I had those wave cut files laying in a drawer , so I thought I would use them on this layout. I added some stitching.


I added some diecuts:


I added that flamingo tag, love it! 


Thanks for stopping by and have a great day!

Wednesday, October 24, 2018

Sing Happy Birthday

Hey there!
We celebrated my Dad's 83rd birthday last month! I used a few photos from his party along with a sketch from Sketch-N-Scrap and  challenges at Scrap Our Stash and Paper Issues for this layout:


I used an older Simple Stories birthday collection. I added watercolors to my background. I fussy cut the word "celebrate", the number "83" and the borders. I added rhinestones to the border along with some stitching:


I fussy cut the party hat, green stars and "happy" banner. I added a few orange puffy stars from Bella Blvd.


I did some more fussy cutting here on the red star and present. I wrote my journaling on the "Another year older" tag and tucked it behind my layers:


Here's the sketch:


and the challenge at Scrap Our Stash:


Thanks for stopping by and have a great day!

 \

Tuesday, October 23, 2018

Volleyball

Hello!
Hope you are having a great week so far!
I am sharing a layout I have up over at Sketches In Thyme  using sketch #346. I used lots of stash for this layout of Sierra playing volleyball her freshman year:


The volleyball  stickers from Scrappin' Sports and More. I guest designed for them many years ago. They were so generous with their goodies!


I added some Bella Blvd puffy star stickers, papers, some punched circles and enamel stickers:


Here is Brenshevia's fun sketch:


Hope you will play along with us!


Friday, October 19, 2018

Friendship and a Tutorial

Hey there!
I am here today to share a layout and a fun layered butterfly tutorial with you that I created for Off The Rails.
I used Shimelle Little By Little collection for this layout:


I fussy cut the flowers from one of the papers. See that cute butterfly? See my tutorial on how to make these later in my post:


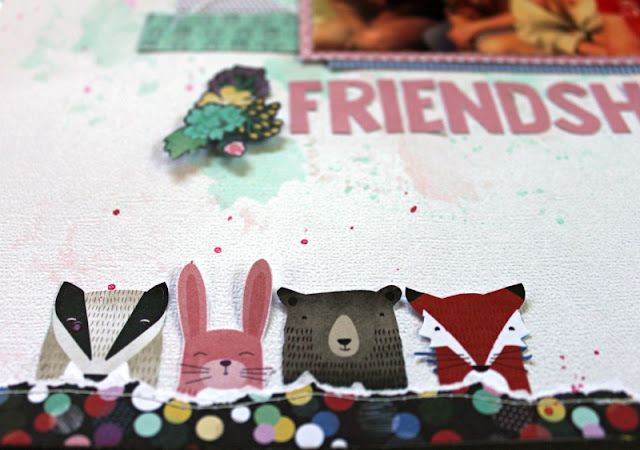
I fussy cut a few more flowers, the title "Friendship" and those cute animals from papers in the collection:


Here is another one of the butterflies I created:


Did you notice the words above the photo? I used this tag from a scrub top  and placed half of it under my photo. I covered the words " Tooniforms and Cherokee" with fussy cut flowers. This is a great way to recycle!


Now for my tutorial on how to make the layered butterflies:
I used 2 different butterfly punches and punched butterflies from 4 different papers in the the collection. 


Layer 4 butterflies, all different patterns on top of each other. I stitched through the body part of the butterfly using my sewing machine and white thread, leaving the tails of thread:


Fluff up the wings. Easy peasy! 
These make fun homemade embellies and they are really fast to make!


Thanks for stopping by and have a great day!


Monday, October 15, 2018

It's A Stay Inside...

Hey there!
There's a fun new case file up at CSI to play along with and of coarse, lots of prizes up for grabs!
I used Fancy Pants Timber Grove for this winter layout:


We got a snowstorm in April of this year, kind of late even for Wisconsin. It was a great day to stay inside and read a book!
I used a premade cut file from my stash, not sure who made it, maybe KI? I added lots of distressing to this page:


I added some old snowflake brads from my stash along with some stickers from this collection:


The alphas are from the collection. I created my own books by using pages from a book, cutting them small. Then I created a cover using patterned paper and stitched them all together. I love how they came out!


Here's the case file:


Hope you will play along with us!
Thanks for stopping by and have a great day!

It's The Happiest Season of All!

Hey!
have you started your Christmas cards yet? I am doing pretty good on mine so far.
There's a new challenge over at Cards In Envy- create a card for your favorite holiday. I used Fancy Pants Holiday Hustle for this Christmas card:


I added a few layers of patterned paper and some stitching for the base of my card. I added a few tags and diecuts, popping some up with foam to add some dimension. To finish my card, I added some twine and a gem.
We would love to have you play along with us!