Wednesday, February 27, 2019

Mother's Day

Hey there!
I am back with you today sharing a layout that I created for ScraPerfect.
I used Transfer Foils, the Perfect Crafting Pouch, the Best Glue Ever and MME Good Day Sunshine for this page. This photo is of my kids and I a few years back on Mother's Day:


This "Mother's day" die cut was on my desk from a previous layout I did. I gathered my supplies:


I added the Best Glue Ever to the die cut using a brush and my finger. I let the glue dry for about 15 minutes, when it was at in a tacky state:


I placed the Orange Transfer Foil, foil side up, on the top part of the word:


Then placed the Teal Transfer Foil on the bottom half. Using my fingers, I rubbed the foil. Then gently peeled the foil off:


Once I removed the foil, I repeated in spots where I wanted more. This was only necessary on the teal part, since I  did not have a full sheet of foil. Because I used a textured cardstock, I ended up with a distressed look to the foiling. I love it!
Finally, I used the Perfect Crafting Pouch to remove any sticky residue:


Here is my final result:


I love how shiny and distressed it looks!


Thanks for stopping by and have a great day!

Saturday, February 23, 2019

Happy: SIT

Hey there friends!
I have a layout up on the Sketches In Thyme blog today and wanted to share it here as well along with some close ups:


I used mist for my background and added it using the packaging technique along with some spattering. I used stash again, mostly  Pink Paislee Cest La Vie along with "Happy" and the hearts from Dear Lizzy.


I fussy cut the chevrons from one of the papers and then added them to my background with some machine stitching.


Here is the sketch I used:


Thanks for stopping and have a great day!


Friday, February 22, 2019

Birthday Card for DRU

Hey all!
I am back to share a birthday card with you that I have up over at Dies R Us today. I used Fancy Pants Life Is Beautiful 6x6 Paper Pad for this beautiful card:


I created a base for my card using a few papers from the paper pad and added some machine stitching. I cut the Boho Flower 3 times. I layered 2 together for my main flower and then cut 1 in half to add to the top and bottom of my card. I LOVE the Olive Branch die and will be using it  a lot in the future! I finished off my card with a few enamel dots and a sticker for my sentiment:


I used these goodies from the store:

Thanks for stopping by and have a great day!


Wednesday, February 20, 2019

Merry

Hello!
Today I am sharing a card I created using a Sketch-N-Scrap sketch and BG Juniper Berry:


Here's the sketch:


Thanks for stopping and have a great day!


Tuesday, February 19, 2019

Merci

Hey there crafty friends!
Just popping in real quick to share a layout with you inspired by this month's mood board at Off The Rails:


I was inspired by the spring colors and those gorgeous mason jars!
Here is my layout:


I used American Crafts stash for this layout. I didn't have many embellies left, so I challenged myself to create a layout without using many embellies. Fussy cutting is a great way to do this! I fussy cut the mason jars from one of the papers and hung them using hand stitching, from my top border. My title was also fussy cut:


Here I fussy cut the flowers and tag:


I did use a die cut (pineapple), 2 stickers, 3 small puffy stickers and 1 button from my stash for embellies, but the majority of this layout is fussy cutting. I love how it came out.
Next time you are short on embellishments, try fussy cutting!

Thanks for stopping by and have a great day!


Monday, February 18, 2019

Family

I am back to share another layout with you. This one I used a Paper Issues cut file and a challenge at Scrap Our Stash. I used an old Crate Paper Valentine line for this family layout:


I hand stitched around the heart with pink embroidery thread. I backed the cut file with a pink patterned paper from another Crate line:


I fussy cut the doily from one of the papers and stamped my date on it. I added a chipboard frame. The hearts I peeled of clothespins that came with this line. The clothespins were too bulky for me to add:


I added a flair from the Crate line along with a chipboard heart and a few chipboard dots. I used some old Thickers for my title. Finally I added some white mist spatters:


Here's the sketch:


This was such a fun layout to create!


Love Ya

Hey there friends!
Today I am sharing a layout I created using a sketch from Sketch-N-Scrap and the March 2018 Hip Kit Club kit. This is a photo of Greg & I from a few years ago:


I cut strips of patterned paper and stitched them to my watercolor background. I added some diecuts, chipboard and used Thickers for my title:


I punched a few hearts and added them to my layout:


Here's the sketch:


Thanks for stopping by and have a great day!


Grow, Bloom, Flourish

Hello friends!
I just wanted to share a beautiful gardening layout that I have up over at Creative Embellishments with you. Do you garden? We have a big vegetable garden.We also have blueberries and raspberries too.  Along with those, I also have some perennial flowers planted. I love being outside in the summer and weeding, for the most part, is relaxing to me. I used lots of Creative Embellishments goodies on this layout:


 I added mists in various shades of yellow and greens to the Flourish 5 chipboard. Then I added the die cut leaves and placed a Fly Away Flair on top. I love the watercolor on this flair, it reminds me of the watercolors I used on my background. I added a wood veneer Bumble Bee, leaving it natural:


Here is another look at that beautiful flourish:


For the title, I used the words "Grow", "Bloom" and "Flourish" from the Flourish Word Set. I used a variety of mists to color them:


To the right of the upper photo, I added a Birdhouse, colored with the same mists as the title:

 
I added a few die cuts from Jen Hatfield, some stitching, some fussy cut butterflies and this gorgeous Grass Border. It was perfect! I also added mists to this chipboard piece:

 
I live in central Wisconsin and it is cold here. This layout warmed me up just a bit creating it, LOL! Thanks for stopping by and have a great day!

Saturday, February 16, 2019

Heart You

Hey there Friends!
I posted a challenge up over at Creative Inspiration yesterday morning for the mini crop. My challenge is to use hearts on your project. EASY PEASY!
This layout was inspired by Missy Whidden.
I used the January 2018 Hip Kit Club kit for this layout of Sierra and I:


For my background, I created a heart mask and then used a Creative Embellishment text stamp and stamped that in the heart using Staz On Ink. I added some watercolor and then hand stitched around the heart with embroidery floss. I hand cut some hearts and layered them in with some die cuts and stickers. I added a piece of Divine Twine to my tag:


I just love all these layers around my photo. Check out that cool PinkFresh tassel bow, LOVE IT!


I added a few heart puffy stickers and also a few hand punched hearts to finish off this page:


Check out the other mini crop challenges, we would love to have you play along!


Friday, February 15, 2019

Guest Designer For Stick It Down

Hey all!
I am excited and honored to be guest designing today for Stick It Down! Ashley sent me a sketch to draw inspiration from. I used the February 2017 Hip Kit Club kit featuring Maggie Holmes and Crate Paper for this layout of Austin and his girlfriend all spiffed up for prom last year:


I used a cut file from the Silhouette Store and cut it on my Cameo using white cardstock. I backed it with patterned paper and stitched around it using gold thread. I added a few fussy cut butterflies:


I added a layer of patterned paper and then added a few die cuts under my photo. 


I used some yummy gold Thickers for my title. I finished this layout off  adding the date with a stamp:


Check out the sketch and play along with us at Stick It Down!


Sweet!

Hello!
Today I am sharing a layout I created for CSI.
I used Crate Paper Love Notes for this layout of Sierra and I:


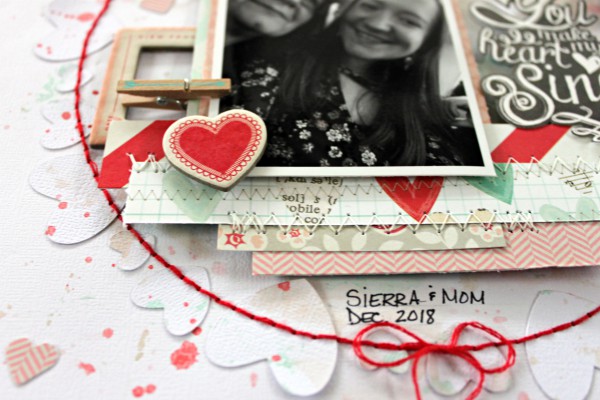
These hearts were cut from my Cameo quite a while ago and had been sitting in a drawer. I thought they would be perfect to add a wreath to this layout. I glued them down and then added a hand stitched circle and tied a bow on the bottom. I fussy cut the "You make my heart sing" from one of the papers. I also added a heart acetate and a flair button:


I added a shelf of patterned paper to the bottom of my photo. I machine stitched the layers together and then added foam behind to pop it up and add some dimension to my layout:


I fussy cut the "XOXO" from one of the papers and then used a punch to punch some hearts. I added a border to the bottom of my page to give my layout some balance:


Here is the case file:


I was inspired by the colors, wreath and shelf. For evidence, I used: paint, wreath, woodgrain (clothespin), hearts, Valentine themed elements, and a frame.

Thanks for stopping by and enjoy your day!