Saturday, June 30, 2018

ES Walk Thru

Hello!
I am back today to share another layout created a week or so ago.
I was excited to see Sketchabilities is back with a monthly sketch and just had to play along!
I used lots from my stash along with a cut file from Just Nick for this layout of Austin:


I added a few swipes of Distress Oxide inks, some water and stamped in black ink using a Creative Embellishment stamp. I cut the cut file out of white cardstock and then added some of the Distress Oxide inks to them. I added a punched border, some stars, enamel dots and a Heidi Swapp sticker:


I used a few different fonts for my title, all are Thickers. I used a Chic tag for my journaling. I fussy cut some flowers and added more enamel. Finally I stamped the date:


Here I added a silver doily, a Just Nick cut file, another fussy cut flower, some more enamel and a flair:


Here is the sketch:


Thanks for stopping and have a great day!


Camp Life

Hey there! Happy weekend!
I spent the last few days painting my screened in porch and putting new wicker furniture together. So I am finally getting around to sharing a few layouts.
I created this camping page for case file #256 at CSI:


I used JilliBean Happy Camper Stew and ScraPerfect's Best Glue Ever along with a cut file from Paper Issues. I cut the file out of white cardstock, backed it with patterned paper and added some machine stitching. I fussy cut the camper from one of the papers.


I added some black scalloped washi tape a few patterned papers behind my photo. I fussy cut the trees, added a few diecuts and a flower:


I used some old Thickers for my title:


Here's the case file:

I was inspired by the colors and camper. I used a camper, scallops, wet medium, animal, plants and star as my evidence and documented something about summer for my testimony.

Thanks for stopping by and have a great day!


Wednesday, June 27, 2018

Easter- ScraPerfect

Hey there Scrappy Friends!
I am back today to share a fun layout using the Transfer Foils, The Best Glue Ever and the Perfect Crafting Pouch by ScraPerfect.

I used Bella Blvd. Birthday Girl and Echo park Springtime for this page as well:


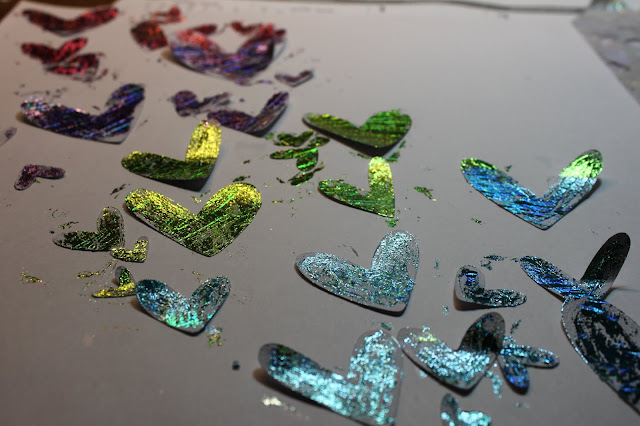
These hearts have been sitting on my scrappy desk for quite awhile and I thought I should use them.
I decided to have some fun with the transfer foils.
I added some of The Best Glue Ever with the No Clog Writing Cap attached. I actually keep this cap on my glue all the time, it saves me from using too much glue. A little bit of The Best Glue Ever goes a long way!


I spread the glue around on using my finger. When it became clear (it goes on white) I placed the Transfer Foil sheet on top and rubber using my finger:


I used 4 different colors of foil for this page: pink, purple, green and teal:


Check out the purple foil! Isn't it gorgeous?!


Some of the hearts I did using 2 colors. Here they are finished:


I used the Perfect Crafting Pouch to get rid of any leftover glue that was tacky:


Finally, I glued the hearts to my layout using The Best Glue Ever:


I also love using this glue on craft foam,which I add to things for dimension on my layouts:


I hope you will give this fun technique a try!

Lisa


Saturday, June 23, 2018

Sunshine and Happiness

Hello Scrappy Friends!
I am up on the Sketches In Thyme blog today with a new layout using Simple Stories You Are Here along with a few other goodies.
I used a few photos from my Spring Break trip to Vegas a few years ago:


I added watercolors to create my background. I fussy cut the word "Sunshine" and "Happiness" from one of the patterned papers. The "&" sticker is from Dear Lizzie and the acetate tag is from Pink Fresh:


I fussy cut the camera, added some patterned paper and stitching. I added an acetate sheet under my photos. I added a flair button from Accent Scrapbooking:


I added the "Escape" circle which I also fussy cut from one of the papers. Finally, I added that cute green bow:


Here is the sketch:


We would love to have you play along with us- just create a layout based off of this sketch and add your link to the side bar of the Sketches In Thyme Blog.

Enjoy your day!


Thursday, June 21, 2018

Another Grad Card

Hello!
We have another graduation party to attend on Saturday. So I created another guy card using some old Basic Grey and a sketch from Sketch-N-Scrap:


Here's the sketch:


Thanks for stopping by and stay scrappy!


Wednesday, June 20, 2018

Scenic Route

Hey there! Happy hump day!
I played along with a sketch from Sketch-N-Scrap and combined it with challenges at Paper Issues and Creative Inspiration. I used some old Elles Studio for this layout:


I hand cut the tag, added a few labels and a few diecut butterflies painted with watercolors:


I added a frame and this gorgeous acrylic heart along with a few diecut arrows:


Here is the sketch:


Thanks for stopping by and have a great day!


Tuesday, June 19, 2018

Sequin Flower Tutorial

Hey there friends!
I have a tutorial up at Off The Rails today. I am sharing a tutorial on how to make these cute sequin flowers that I used on this layout:


I used Echo Park Simple Life and So Happy Together for this layout. I cut the title, flower and leaves using my Cameo and colored them with watercolors:


I used watercolors for my background as well. I added a few torn strips of paper at the bottom and a fussy cut flower along with one of the sequin flowers:


Here is another sequin flower:


Hope you will go check out my fun tutorial at Off The Rails and tell them I sent you.

Thanks!


Monday, June 18, 2018

Feeling Blue...

Hey there scrappy friends!
There's a new challenge up over at Cards In Envy!
The challenge is called- Feeling Blue and distressed. The challenge is to create a card with distress inks and lots of the color blue.

I used a white piece of cardstock and added modeling paste through a Prima stencil. Then I took 2 Ranger Distress Inks-Faded Jeans & Salty Ocean. I smooshed them one at a time on plastic packaging, spritzed it with water and smooshed it onto the stenciled background. I continued this until I was pleased with the result:


I stamped my sentiment using embossing ink, added embossing powder and heat set it. I added a few different blue washi tapes, stitching them in place. Finally I punched 2 butterflies from white cardstock and glued them on:


We would love to have you play along with us! 
Thanks for stopping by and have a great day!

Thursday, June 14, 2018

Life Doesn't Get Any Better

Hello!
Life has been so busy lately with work, Greg's health issues and graduation that I haven't had much free time to scrap for fun. I took a few hours this morning to do just that before all the work of getting ready for Austin's graduation party on Saturday.
I played along with case file #255 at CSI and Scrap the Boys June challenge. I used a variety of manufacturers for this page:


I created my background using watercolors and then used the circle stamp from Creative Embellishment and stamped with black ink. For my title, I used: Prima, My Mind's Eye, Pink Paislee, Cosmo Cricket and Making Memories along with the "Better" sticker from Amy Tan. I used a circle punch and punched the "Best Ever":


I added a few layers behind my photo and then added more punched circles, washi tape, a Heidi Swapp sticker and a chipboard piece from Mambi:


I added a few more Heidi Swapp stickers, a diecut donut and donut sticker from Amy Tan, some stitching and a few fussy cut hearts:


Here is the case file:

I was inspired by the colors and donuts.
My evidence is:
solid white background
scallops
stripes
hearts
dots
circles
and donuts
For my testimony, I documented food.

Here's the Scrap the Boys challenge:


Thanks for stopping by and stay scrappy!


Wednesday, June 13, 2018

Graduation Invites

Hey there scrappy friends!
I am here to share a fun and easy graduation invite I have up on the ScraPerfect Blog today. Austin is graduating from high school this year. Rather than having someone make invites for his party, I decided to create my own.

I used an invite I found on Pinterest: http://www.make-your-own-invitations.com/printable-graduation-invitations.html

I spiffed it up a bit by adding some color and the year in a few places. For safety reasons, I blurred out the party specifics. I created a word document and printed 4 out per page on matte photo paper.
Here's what I came up with:


I started by cutting the cardstock to size.
The orange is 3 3/4"x 5 1/8"
Black is 3 1/2"x 4 3/4"
The invite is 3 1/4"x 4 1/2"
I added The Best Glue Ever to the back of the black cardstock using the No Clog Writing Cap. Just a little bit of this glue goes a long way! I adhered the black cardstock to the orange cardstock. 


I added The Best Glue Ever to the  back of the invite in the same manner and adhered this to the black cardstock.


Now all I have to do is address the envelopes and include one of his senior photos.
Thanks for stopping by and have a great day!


Monday, June 4, 2018

"20"

Hey there!
I am back to share a layout using some fun Whisker Graphics goodies!
I used Jilli Bean Soup Spotted Owl Soup, a large Whisker Graphics Tag, a Little Bitty Bag and Whisker Graphics Divine Twine in 3 colors: Green solid, Navy Solid and Blueberry.


I cut the number "20" out of my background using my silhouette Cameo. I backed it with patterned paper and decided to hand stitch around the numbers. I normally use embroidery floss to do this, but decided to try hand stitching with the Divine Twine instead. I love the results! I used the Navy Solid. The twine has 4 threads that are wound together, I divided it in half and used 2 pieces for my stitching. I poked holes using a pin and began my stitching:


Here it is finished:


I colored my tag using Gelatos and used  that for my journaling:


I wrapped the Green Solid twine around my photo and tied it into a bow:


I strung a banner, popped up with foam and added the Blueberry twine to hang it:


Thanks for stopping by and have a great day!

Lisa