Monday, April 27, 2020

Our Happy Place

Hey there friends!
I played along with the PinkFresh Studio sketch this month and came up with this camping page:


I used Everyday Musings collection. I used a hexagon punch and punched 4 different 6x6 patterned papers. I placed them on my white cardstock background and stitched through them. I added some diecuts from the ephemera pack, a sticker and the gold heart sticker:


I popped the photo up on foam to add some dimension to my page. I added some stickers and check out that font for my title, I LOVE IT!


I added in a few small OA block alphas to my title. They were the perfect color and at least I used a bit of my stash, LOL!


Here's the sketch:


I had a blast playing along with this challenge and love how my page came out!
Thanks for stopping by and I will see you soon!


Thursday, April 23, 2020

Marburger Schloss

Hey friends!
I have a layout to share with you today that I created for Sketches In Thyme. I used PinkFresh My Favorite Story for this layout of Greg and Sierra while on vacation in Marburg:


I added lots of fun diecuts, popping some up with foam:


I added some puffy hearts and mist spatters:


I used 2 different alphas for my title:


I added a small embellie cluster in the lower right corner:


Here's the sketch:


Thanks for stopping by and I hope you will play along with us!


Tuesday, April 21, 2020

True Friends

Hello!
I am back to share a layout with you that I created for Creative Embellishments.
This photo is of myself and a very good friend of mine from school. We lost touch for many years but several years ago decided to go camping. Although we live a few hours away from each other, we try and get a few camping trips in every year. She got remarried last summer and I was her maid of honor. I am so blessed to have her and her hubby in our lives!


I used a PinkFresh Studio patterned paper for my background. I colored the True Friends Quote with a Nuvo Glitter Marker. Check out all the sparkle:


Under my photo, I added a frame and  word phrase die cut from Pretty Little Studios. I used the Basic Alphabet Set colored with the same Nuvo Glitter Marker for my subtitle:

 
I fussy cut a bunch of flowers from a Dear Lizzie paper and added a strip of them down my page. I tucked in a few Delphinium colored with a Nuvo Glitter Marker:

 
I added a cluster on the left side of my page and included a flair from the Dream On Flair set. Finally I added lots of watercolor spatters:

 
I absolutely love how this page came out and it was so much fun to create! Thanks for sharing your day with me!

Wednesday, April 15, 2020

Tough Ride

Hey friends!
I am sharing a layout today created for CSI cold case file #317.
I used a cut file from Paige Evans and backed it with Simple Stories papers:


I backed my photos with the same patterned paper and fussy cut the flowers and words:


I added some square alpha stickers from the collection for my title. I added a few pieces of Magic Mesh, remember that? along with some stitching in black:


Here's the case file:


Thanks for stopping by and have a great day!


Wednesday, April 8, 2020

Beyond The Clouds Excited!

Hey there!
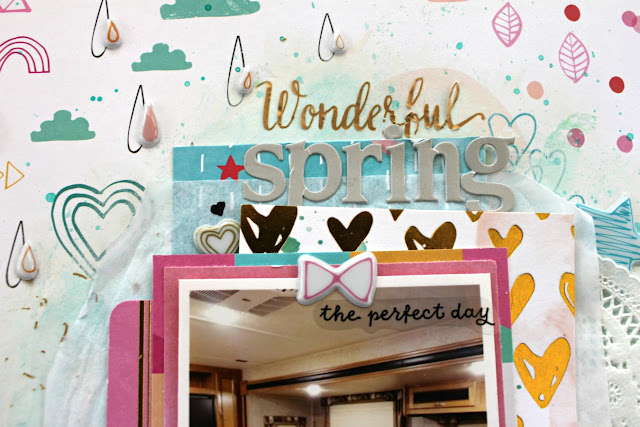
Today I am sharing a layout created for CSI using case file #316 along with PinkFresh Studios Up In The Clouds collection. The picture in the case file reminded me of this paper from PinkFresh, so I used it as my background. I added Gesso and watercolor to it:


I added a few pocket life cards, a doily, tissue paper and patterned papers under my photo. I used a rub-on from the collection for the word "wonderful" in my subtitle. I used Cloud 9 alpha stickers for the rest. I added in a few puffy stickers and a clear sticker:


I popped my photo up with craft foam. I added the pink banner to the bottom of my photo. I used a puffy sticker and gold foam stickers for my title. I added in clear sticker, puffy stickers regular stickers and a wood button:


Here is another look at all the layers:


This is the fun case file:


I have to admit, I struggled for a bit with this page. I had the photo with just a few layers under it on the background paper and liked it, but didn't love it.... I decided to try a Missy Whidden technique- gesso then color. I'm not sure why this never works for me... maybe using a different gesso? Any ways, I had too big of a spot of color. I added more gesso, still not liking it.  Finally, I added more layers under the photo hiding most of the color and liking it. Like Missy says, it was a hot mess! LOL!
Thanks for stopping by and have a great day!


Tuesday, April 7, 2020

A Canvas for Creative Embellishments

Hey friends!
Several years ago my MIL gave us some Norwegian Hollyhock seeds, which is a favorite flower in the Moen family. I planted them in my flower bed and in a few years they were coming up all over in my vegetable garden. These flowers are so pretty! I took a few photos of them that summer and decided to finally scrap this memory on a canvas using some chipboard from Creative Embellishments.
Here's my canvas:


To prep the background of the canvas, I added white Gesso. I used the Distressed Grid Stencil to add texture paste. When it was dry, I added several layers of mists. Finally, I used black ink and stamped the background with the Distressed Grid Stamp.


 I added a layer of green vellum under my photo. I used the word "beautiful" from the Gorgeous Small Border Word Set and sprayed it with mists:


I framed my photo with the Leafy Vine Frame and sprayed it with some mists as well:


I added lots of flowers around the frame, some stamped ones and included the Daisy Cluster, which I cut in half and added some to each side of the frame. I added some Glass Beads to the center of the Daisy Clusters, primed with Gesso and then added some mists:


Here's a closer look of the Daisy Cluster on the right side. I added a strip of Magic Mesh across the canvas, remember that stuff? I also tucked in 3 wood veneer Bumblebees colored with inks and mists. Finally, I added lots and lots of spatters with mists and paints:


I absolutely love how this canvas came out! 
Thanks for stopping by and have a great day!


Wednesday, April 1, 2020

Easter

Hey friends!
It's the first of the month, so that means a new mood board and twist at Creative Embellishments.

I was so inspired by so many things in this months mood board: the colors, mason jars, lights and Easter bunny. I decided to create an Easter layout: 


I used the Mason Jar Banner at the top of my layout. I colored the jars with acrylic paint. I colored the lights with yellow acrylic paint and then rubbed some gold over the top. I also added the gold paint to the lids:


For my title, I used the Happy Easter and did an ombre effect using acrylic paint:


I backed my photos with papers from PhotoPlay Bloom collection. I used acrylic paint to color the Fun Eggs and tucked 2 under the right side of my photos. I fussy cut some flowers and added them to my page:  


I used an Easter Basket and painted it in an ombre effect. In the basket I placed a Fun Egg and a wood veneer Bunnies painted with acrylic paint. I also added in some word phrase stickers from Tim Holtz and Teresa Collins. Finally, I added the Momenta gold hearts and arrows:


I had a blast creating this layout of Sierra! Check out the moodboard on the Creative Embellishments blog and play along with us this month!


Dreaming

Hey friends!
Today I am sharing a layout created for CSI using case file #315. I was inspired by the colors, rug and hexagons:


I mostly used PinkFresh Dream On and My favorite Story for this page. The yellow hexagon paper is from Amy Tangerine and the plaid is from Pretty Little Studios. I used a punch for my hexagons and added some machine stitching using white thread. I also added in 3 Creative Embellishment chipboard hexagons and added some journaling in 2 of them. I fussy cut the camera and cloud from one of the PinkFresh papers:


The title is from the Dream On collection and was perfect for this page of Sierra and Robin. I fussy cut some flowers from one of the My Favorite Stories paper and placed them to the lower right side of my photo. I also fussy cut some of the potted plants, bird and an arrow from the Dream On 6x6 paper pad. I added in a few heart brads and a few doodled ones as well:


I added a border to the left side of my page along with some stitching and a few more fussy cut flowers. Finally, I added some paint spatters:


Here's the case file:


I loved the colors in this one and had a blast creating this fun page!
Thanks for stopping by and have a great day!